![]()
The Writers Voice
The World's
Favourite Literary Website
![]()
Cutting Glass
by
Clive Michie
![]()
Glasscutters
This was written in the 70-s - cutter have changed since then but the cutting of glass remains the same.
Depending on the type of glass that you are going to be cutting and the intricacy of the cut you may want to get 2 of the following cutters.
You should choice one glasscutter with a large wheel and one with a small wheel.
The steel wheel cutter will not last as long as a carbide cutter but is very handy for thin clear glasses. The small wheel cutters are better for tight complex cuts. While the large wheel cutters are better for cutting hard opalescence glasses and on a straight edge.
The Cutters
Fletcher Carbide Wheel Glasscutter
Small Wheel
Large Wheel
![]()
Steel Wheel Glasscutter
Small Wheel
Large Wheel
![]()
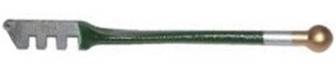
Pliers
Selecting a good quality cutter will save you time and money in the long run, and will make you more proficient with the cutting of glass.
Grossing pliers have a curved jaw and a flat jaw. The flat jaw is held on the top when breaking glass and the curved jaw is held on top when chipping away unwanted glass.
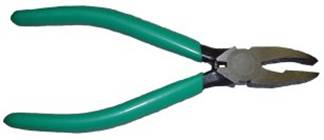
Grossing Pliers
![]()
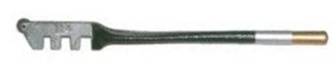
Running pliers have one concave and one convex jaw with a setscrew.
These pliers are used to gently start a cut that you have made on glass.

Running
Pliers
![]()
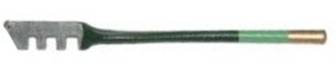
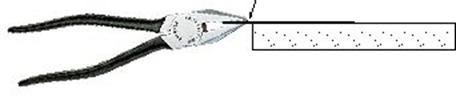
Flat jaw breaking pliers are use as a general breaker. The 2 flat jaws allow you to get close to the score you made with your glasscutter. You will notice that there is a taper on the jaw so that when you open the pliers the front of the jaw will pinch the glass and it wont be chipped by the inside portion of the jaw.
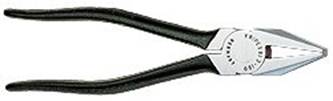
Breaking
pliers
You will need at least 2 of these pliers to do a good job of breaking out the cuts you make in the glass. The flat jaw and the grossing pliers will be a necessity.
![]()
Holding The Glasscutter.
The glasscutter can be held like a pencil or with the shaft of the cutter between the index and middle fingers. Place the index finger or both index and middle fingers on the support built in to the front of the cutter and your thumb on the back support.
If you place the cutter in-between the index and middle finger there will be a bit of a twist in your wrist but in the long run it is worth knowing. Holding the cutter at the angle shown below with the teeth facing down place the wheel on the work surface, this can be your workbench or table. Observe there is an angle on the bottom of the cutter that must be held parallel to the work surface. In stained glass work the teeth on the back or underside of the cutter are not used.
| The angel at the bottom of the cutter should be parallel to the work surface and the cutter should be held at right angels to the surface of the work area. Do not lean the cutter to the left or right as this will cause a bad cut that will make it hard to break out. |

When holding the cutter down to the work surface you should be able to have your eye directly over the cutter wheel to avoid excess parallax that would cause you to cut the piece the wrong size. The cutter is steered by the raising and lowering of your elbow, trying to keep the wrist straight and your head directly above the cutter wheel. Lets do a little practice steering this cutter. Get a piece of paper and draw a straight line on it. Practice following the line by raising and lowering your elbow a little.
![]()
Ok now draw something like this below on the paper.

Place the paper on the table so that it is following the front edge of the workspace. Practice following the curved line with the cutter and notice that you have to raise and lower your elbow a lot to steer the cutter and even twist left and right from the waist. There can be a lot of body language in the art of cutting glass.
DO NOT BEND YOUR WRIST.
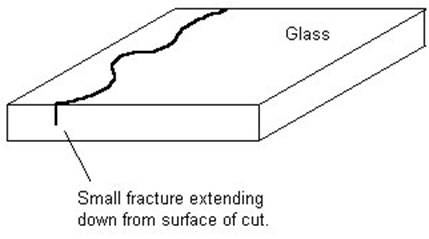
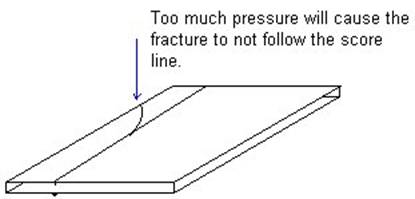
When the cutter scores the surface of the glass it leaves a little fracture extending down from the surface. This sets up a week point in the glass.
The cutter wheel has a small axle that requires a little oil to keep it running smooth and freely. You can accomplish this by placing a piece of cloths in a lid off some jar and adding a small quantity of oil. Run the cutter back and forth over the oiled cloths. This will lubricate the cutter wheel and help to remove some of the glass chips that build up around the cutter wheel.
![]()
Ok now that you have become familiar with the cutter it is time we start cutting some glass, remember glass is very sharp. Get out the box of scrap clear glass from broken picture frames and windows and a box of Band-Aids.
It will be best to start on clear glass that is 3 mm thick or what is referred to as single diamond. Select a piece of glass that is at least 6 inches square or larger. Place the paper with a straight line drawn on it, under the clear glass with the line running away from you.
Ok now place the cutter wheel down on the surface of the glass as close to the edge closest to you. Slowly push the cutter away from you following the line and remember to steer with your elbow. Increasing the pressure on the cutter till you get the sound of paper ripping from the glass.
You have pressed too hard on the cutter if the glass makes a crackle snap and popping sound and little slivers of glass jump off the surface beside the score. If glass slivers pop off the surface of the glass after you have made your cut, it will affect the ability to break the cut out.
Try making some straight line cuts on the piece of glass about ½ an inch apart. Keep repeating this till you get a feeling for the hardness of the glass. After you have become familiar with the glass and cutter we will do the first cut and break it out.
Select another piece of clear glass and place it over the paper with the line approximately 1 inch from the edge. Remember to run the glasscutter over the oiled cloths in the lid. Now slowly make your cut from one edge to another.
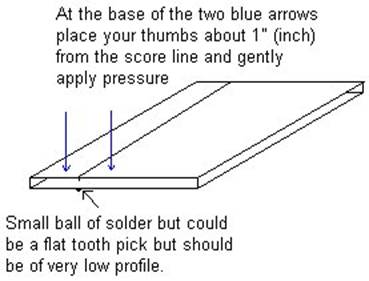
Once the score is made on the glass place a small object like a flat tooth pick or straightened paper clip under the score about ¼ inch in and then place your thumbs on the glass one on each side of the score. Your thumbs will be pointing at each other.
By applying the pressure slowly you will hear the crack of the fracture start and if the pressure is applied real carefully you will see that the score or fracture runs part way along the score.
Again if the score is made too hard then the glass may break wrong causing the fracture to run off the score.
This may also be caused by the object that is placed under the glass is too large. If you are using a pencil then it is too large, even a round toothpick may be too thick. How ever this is only the first way of running a straight cut. It is intended for the beginners that need to get a feeling for the glass and get a smaller piece cut from a larger one for ease of handling. We will now look at many other ways of breaking this cut out.
Using Running Pliers
The running pliers have concave and convex jaws that allows for the same action of pressure on the fracture as we experienced in the first way we ran the fracture on a toothpick.
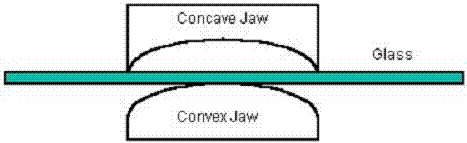
There is a setscrew that will allow you to set the pliers to the thickness of the glass. The pliers should be held inline to the glass with the glass extending an inch off the work surface toward you. On the top jaw of the running pliers there is a notch to indicate where the pressure will be applied. This must be lined up with score on the glass. The Jaws should not be placed more then a ½ inch on to the glass.
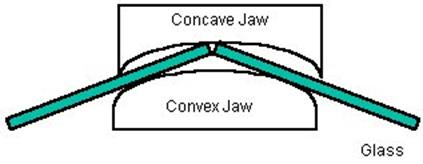
Squeeze the handles on the running pliers and increase pressure till the fracture starts. If the fracture doesn’t start then back off the setscrew a little 1/20 of a turn. Once the fracture has started then back off the setscrew a little more. Many people don’t use the setscrew for small straight cuts. But the accuracy of pressure for starting the fracture on complex cuts can be a real benefit. Practice cutting and breaking some small straight cuts with the running pliers
![]()
Using Breaking Pliers
When using the flat jaw pliers it is important to have a firm grip but not to excess. Line up the nose of the pliers just behind the score and close as possible to the edge of the glass where the cut began or finished.
Slowly apply pressure down on the handles of the pliers until the top flat jaw rests on the glass then a little more pressure and it should run the fracture.
If the fracture only runs half way -- then re-align your pliers close to where the fracture stopped but not on a portion that the fracture has not run to. This makes it easy to rip the fracture to the edge of the score. Remember that you must not pull back towards you as this will steer the fracture off the score line and create a bad cut.
If you buy a good quality flat jaw breaking pliers you will be able to use the corners of the jaw to chip small pieces out and even chew out difficult cuts.
Line the nose of the pliers up with the score but do not overlap it.
More to come some time.
![]()
Return to The Stained Glass Town Square.
![]()
Critique this work
![]()
Click on the book to leave a comment about this work
![]()